How do you print on tissue paper for photo encaustic?
Whenever I explain that I print my images directly on tissue paper, I can instantly see the confusion. Most people imagine running a fragile, fluttery sheet of tissue through a printer—and understandably freeze at the thought.
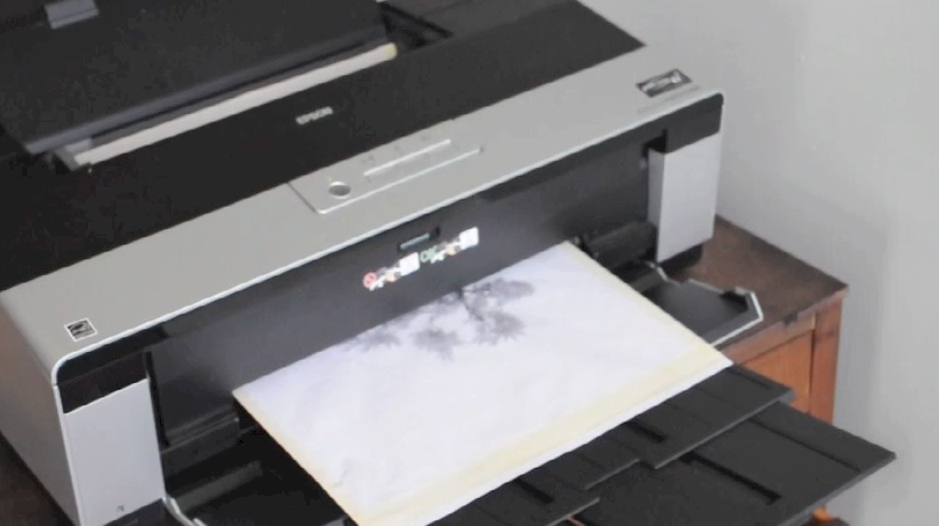
The secret? A carrier sheet.
By taping your tissue paper onto a sturdier sheet, you can guide it through many printers with surprisingly beautiful results. Not all printers handle this well, so expect some trial and error.
I use a 13×19 Epson R2880, starting with a 13×19 carrier sheet and trimming the tissue slightly smaller. The key: leave at least ¼ inch from the leading edge before you start taping. Tape only three sides, making sure the feed edge is just the carrier sheet—no tissue touching the printer’s grabbing mechanism.
A few tips to make the process smoother:
-
Keep the tape as close to the edge as possible so the print head doesn’t catch.
-
Stand near your printer—lightly guide the paper if the print head begins to drag.
-
NEVER tape right up to the leading edge. Tissue will shred, and you’ll be extracting tiny pieces from inside your printer with tweezers.
-
Leave the bottom untaped.
-
Expect misfeeds. They happen.
-
Tissue paper has no ICC profiles.
-
Saturated images may show marks where the print head drags—embrace these imperfections. They contribute to the tactile, organic feel of encaustic work.
Once your image is printed, you’re ready for the magic: embedding it into your encaustic piece.
Curious about incorporating tissue paper into your encaustic photography? Learning to print on tissue is a game-changer—adding translucency, depth, and texture to your work. And once you understand the simple setup (a carrier sheet and careful taping), you’ll unlock a whole new layer of creative expression.
If you want to dive deeper into why tissue paper is such a powerful tool, how it behaves in wax, and how to use it for soulful, dimensional imagery… Explore my online course: Embracing Tissue Paper>>.
I’d love to hear from you. Have you tried printing on tissue (or other non-traditional papers)? How did it work for you? Tell me what you think in the comments below.
Be well….be creative,
Clare
Learn how photographs, wax, and intuition come together.
View my photo encaustic classes, courses, and workshops.
Thanks Clare for the tips. Question: Do you use any particular type of tissue?
Hi Linda, the tissue should be archival:)
Are you talking about tissue paper that you can stuff into presents? If you are, then you have made my life. Ha!
Yes Lillian, it should be archival tissue paper though.
When you say “archival” do you mean “Acid Free”?
Archival tissue paper is that which contains no free acid and has a pH value 7.0 or greater.
Thanks for repeating this info Clare. My printer was grabbing the tissue and totally mangling it until I tried your system of leaving the 1/4″space on the leading edge. Works very well now!
I learned this lesson the VERY hard way. I had to get surgical tools to pick all the bits and pieces of the tissue out of my printer after it all got mangled in there!
Thanks for this explanation. It is the clearest I have seen so far. The thinner types of rice paper also may work this technique. I will be trying it out in the coming weeks.
Yes, this technique can be used with any type of non-traditional paper that won’t easily feed into your printer. Good luck with your experimentation.
Great tip, Clare. Thanks for sharing.
In your feed system is the “bottom” edge the last part to go into the printer or the first?
Thanx!
I’m not sure I completely understand your question. You don’t want the printer to ‘know’ that it’s grabbing/feeding anything but a piece of regular paper.
ok, lets see if I have this correct. Wish I could draw you a picture. Right hand side of paper, tape goes around both sheets. Left hand side the same. No tape on one of the other sides where about 1/4 inch of photo paper shows and the last side the tape also goes around both sheets. I guess I thought the last taped side was the feeder side. Is there any tape on the feeder side? Is this a bit different than how you did it a few years back? Hope this makes sense. Where my confusion is –how does the tape look on the feeder side?
Hi Kay, it’s the same as I’ve always done.
1. Top (feeder side) tape tissue paper down 1/4 inch from top of carrier sheet.
2. Tape tissue to both sides
3. Bottom – no tape
Thanks for sharing your tips. I dabbled with photo encaustics a few years ago and this makes me want to experiment with it again. Could you recommend a brand of tissue paper that you find works best for you and where it could be purchased?
I’m glad you’re thinking of getting back into it. I purchase bulk tissue from Uline.com.
Thanks, Clare!
Inkjet or laser printer or does it matter?
Denny, I’ve never tried printing on tissue paper using a laser printer, I guess it would all depend on how easily it threads through the printer.
My brother suggested I may like this web site. He was once totally right.
This publish actually made my day. You cann’t imagine
simply how much time I had spent for this info! Thanks!
Major thanks for the article.Thanks Again. Cool.
hi Clare, am interested in what type of tape is safe for an Epson r2000. do you use double sided tape? thanks for this article!
Hi Diane, I use regular masking tape. Running tissue paper through your printer is always a risk that it will get caught…..and not sure I can tell you what type of tape is safe. All I can say is that what I use. Hope that helps.
Thank you Clare. I just tried your technique a few days ago.. I learned how to do it in your online workshop. I hadn’t tried it for a while since I had several botched attempts. This time I got a great print. I’m hooked.
Great Joy. I’m glad to hear that it worked and that you are hooked! It’s music to my ears.
Where do you purchase your archival tissue paper.
Here is a resource for you Gloria. http://www.archivalmethods.com/product/archival-tissue
Hi Clare~ I was cruising around and found your page. I saw that someone asked about using a laser printer for this process… It definitely depends on your printer so this won’t work for everyone. As you know, tape melts, so that is out of the question for a laser printer. What I do is use a glue stick around the edge of tissue (slightly smaller than my 8.5×11′ paper) and strick it to my firmer “feeder” paper. Works great for me but my mom can’t use this method with her laser printer. And of course, the tissue may tear a little when peeling it off the other. One more thing, I glue all the edges down. Never tried it with only a couple sides, so do with that info as you will and good luck!
Thanks, Clare. But I’m wondering why archival tissue paper when you’re covering it with wax. No chance of air getting to it…
Ah yes, but wax doesn’t protect against UV light which will yellow material if it’s not archival. And I also believe that artists should use the best material they can afford if they are selling their work.
What thickness carrier paper do you use?
I use the Epson 3* paper, Epson Presentation Paper Matte. But you can use any paper that your printer will accept that is cheap. There is nothing special about the carrier sheet.