
What Images Work Best for Printing on Tissue Paper?
This is one of the concepts my students struggle with most—and it’s no surprise. When we photograph, we rarely shoot against clean white backgrounds unless we’re working in a controlled studio environment. But when it comes to printing on tissue paper, your background matters more than you think.
Before choosing an image, let’s talk about why we print on tissue paper in the first place.
Why Tissue Paper Works So Beautifully in Encaustic Art
Tissue paper allows you to create entirely new backgrounds for your images.
When embedded in wax, the thin paper becomes almost fully translucent—the fibers absorb the wax, and the tissue “disappears,” leaving just your printed image floating above the background you’ve created.
This is the magic of working with tissue paper….the background becomes part of the final artwork.
But… Not Every Image Works
Unlike coated photo papers, tissue paper has no protective layer to prevent ink from wicking and spreading. This leads to two key challenges:
-
Highly saturated prints swell with moisture—This can cause the print head to drag across the paper and leave marks.
-
Images with color throughout the frame don’t allow the background to show through—If your entire photograph is filled with color and detail, embedding it in wax will mute your background entirely.
In my own work—especially when photographing horses—my subjects are almost always surrounded by fields, barns, or landscape. To make these images suitable for tissue paper, I remove the backgrounds in Photoshop.
Others prefer to shoot against clean skies or white backdrops for the same effect.
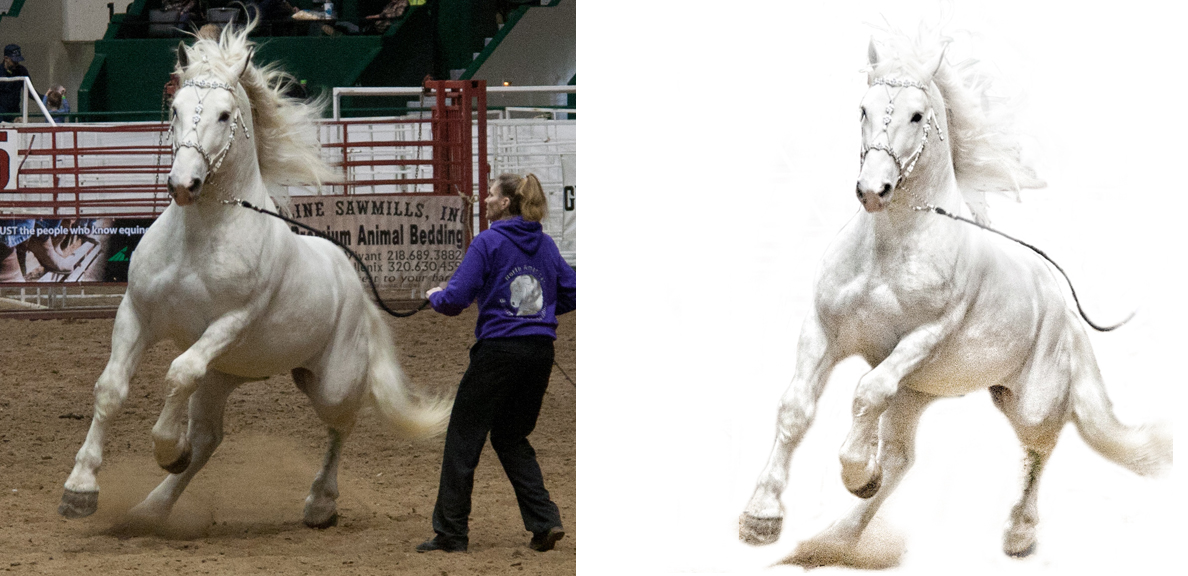
Imagine this unedited photo of a horse standing against a busy backdrop.
Once embedded into wax, only the areas around the subject that aren’t saturated would allow your custom background to show through—resulting in a blotchy, uneven effect.
But isolate that same horse…and suddenly the subject lifts off the surface and becomes part of a completely new visual world.
Preparing Your Images for Tissue Paper
Here are a few quick guidelines:
-
Choose images where the main subject can be cleanly isolated
-
Avoid full-frame saturated photos
-
Leave white or light areas for your encaustic background to shine through
-
Keep compositions simple and strong
-
Expect (and embrace!) some printer imperfections—they’re part of the charm
If you want to go deeper into this topic, I’ve created an online course sharing everything I know about working with tissue paper and encaustics. For more details click here Embracing Tissue Paper>>.
Would love to hear from you about your successes and failures printing on tissue paper. Leave your comment below.
Be well….be creative,
Clare
Learn how photographs, wax, and intuition come together.
View my photo encaustic classes, courses, and workshops.
Does tissue come in sizes larger than 8.5 X 11? Have you ever worked with a large image using tissue? I have an idea for a 20 X 30 project in which I would piece the tissue together, any comments on that, pitfalls, things to be aware of?
Hi Kathleen, yes tissue paper will come in all sorts of sizes….I think last I purchased was 30×40. All my work is large and I have to tile the tissue paper together….sometimes up to 8 tissue prints in a piece. It can be tedious to hide the seams but it can be done. Texture is your friend when tiling pieces together. Good luck.
I love this technique also. I have used various densities of rice paper, experimenting to get the look I want.
This technique also works for adding text or hand drawn elements into the work. Just print or draw your text or whatever onto the tissue paper or rice paper and embed it in the wax just like you would a photo. It adds another element to the finished work.
Thanks for your comment Larry. Yes, this is a great way to add text (or a signature even). Personally, my next task it experiment with a couple of the rice papers that I’ve found. There is always more to explore:)
A couple of “tricks” I’ve found:
To help reduce the bleed on the edges of the subject that is fairly saturated with color, I’ll dial down color density setting for my printer (an Epson 3880);
To help reduce the smears that happen when the print head drags across the wet tissue, I increase the paper thickness and the platen gap settings for my printer.
And, yes, being ok with the unexpected “stuff” that happens when printing on tissue paper or any other non-standard material, is the most important part of all, in my opinion!
Thanks Deb. Great tricks.
This may have been asked and answered. Sorry for the repetition if so. Does Rice Paper work just as well?
Thanks.
Yes. Rice paper would be the same process.
Super interesting and something that I will need to try.
I’m in the market for a printer. Any recommendations for units that will print well on tissue or other fragile papers?
Thanks
Hi Steve, I use a Canon Pixma MG7720 that I bring with me to workshops and an Epson R2880 in my studio. Both work well. I know my students use all sorts of other makes and models. Just make sure that you load archival ink into it. And if you are doing photo transfers make sure it’s not a dye based ink.
Your backgrounds look like they have plenty of texture. I’ve always laid down my tissue prints on a smooth surface. Does it work to place them over texture?
Hi Donna, embedding tissue paper doesn’t work as well over texture as a smooth surface. My backgrounds are actually incredibly smooth before I lay the tissue paper down. Afterwards is when I build up the texture.
I have a handle on printing with tissue paper, but the advice on image selection was much appreciated, since I hadn’t yet thought that part through. Thanks!
Thanks Judy. Yes, it seems to be a block for most students how to choose an image that works best as an embedded tissue.
Fabulous work Clare! Love the isolated horse subject and the tutorial on tissue printing. Have done it done. Will continue to learn to use.
So glad you are continuing to work with the process. You do great work.
I’ve really enjoyed reading your blogs Clare. I’m looking forward to start the class in October and I’d like to try this myself. It sounds like exactly what I want to learn. Very nice, thanks!
You are very welcome Jeannie. Looking forward to having you in class.
Hi,
Thank you for the very useful information on your website. I do a lot of image transfers with laser prints and the more saturated the photo the better. I’ll have to start looking at my less saturated images for some of the encaustic work I want to try. I was wondering if you use an ink jet printer for your tissue paper images or a laser printer? Also, have you ever worked with older, porous wood to build your images on?
Thanks,
Adrienne
Hi Adrienne, so glad you like the website and blog. Personally I use an inkjet printer for all my printing…..it’s what works best for me. And no, I’ve never worked with older woods. I do all my work on 2 inch cradled boards. But it’s certainly worth experimenting with if you have access to older, porous wood.
Hi Clare,
Thanks so much for your quick reply. Your work is beautiful.
Adrienne