You will be challenged.
There’s no way around it. As artists, we’re irresistibly drawn to beeswax—the texture, the transformation, the luminous depth it brings to an image. But as magical as it is, encaustic photography has a learning curve, and you’ll feel it.
Students in nearly every workshop say the same thing: “This is harder than it looks.” And they’re right. After all, you’re brushing hot wax onto a cool surface, hoping it won’t solidify before you lay down the perfect stroke. It’s not complicated, but it does require practice, patience, and a willingness to push through the awkward beginning stage.
But once you find your rhythm, you will fall completely in love.
The possibilities expand endlessly. Experimentation becomes exciting instead of intimidating. Some attempts work beautifully, others fail spectacularly—but both are essential parts of the process.
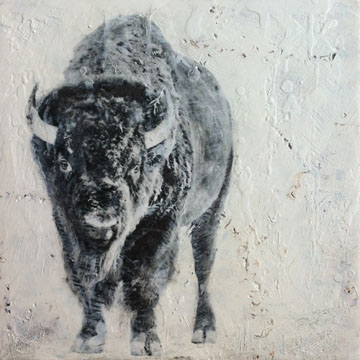
I was reminded of this after a trip to the Badlands of South Dakota. I photographed buffalo for hours—majestic, mysterious, powerful. I even collected some old rusted razor wire, imagining how beautifully it would integrate with their rugged presence.
And then I created the piece.
Ugh. Not my vision. Not even close.
The buffalo felt static—everything my work typically isn’t. And the razor wire? That experiment fell flat too (though I have other plans for it). Even after years in this medium, I misstep constantly.
The beauty of encaustic, though, is that nothing is ever final. You can scrape, adjust, layer, rework, and begin again. My buffalo piece will almost certainly be melted down and reborn.
So if you’re new to this process, my best advice is simple:
Experiment. Try new techniques. Follow your ideas. Test your vision.
If it doesn’t work, there’s always Plan B.
Ready to learn the core techniques and start experimenting with confidence?
Build your skills, strengthen your artistic voice, and explore the possibilities of beeswax in my signature encaustic resource: Explore Encaustic Photography: https://photoencaustic.com/beginner-photo-encaustic-course/
I’d love to hear from you. What has been your biggest challenge in learning photo encaustic? Tell me what you think in the comments below.
Be well….be creative,
Clare
Learn how photographs, wax, and intuition come together.
View my photo encaustic classes, courses, and workshops.
My biggest challenge, during my first two tries at photo encaustic, was to learn to take my time, be patient, and realize that I am in the learning process — not expecting a perfect (or even real nice) image right from the get-go. Once I realized that I was able to go more slowly, experiment over and over with the same image, and make some nice progress. I will also, as I go forward, take more time to develop my vision of what I want my image to look like when I’m done.
I have tried photo encaustic a few times and have fallen in love with all the possibilities. So that’s my challenge trying to decide which way to go…transfer, pour, collage…I’m looking forward to your online class this Fall!
By the way, I happen to really like the buffalo image!
Hi Beth, I know what you mean about the endless possibilities. It’s mind boggling and exciting all at once. There have been a few times that I’ve tried the same image with multiple techniques to see which one provides the results I like best!
Thanks for the comment about my buffalo. If he was just running towards me and not standing there I think I might like it better. But then again, him running towards me would have presented a few other challenges since I don’t have a long lens…….
Hi, Clare,
I am just beginning with PE. I am working on scrap wood and not using primo materials so there is that. My original wax base surface always (my first 3 pieces) comes out very textured and bumpy, not that there is anything wrong with that, but I’d like the choice to have a smooth texture to work ones well.
Also I want to work with my wildlife images and my pencil charcoal sketches, (I am a wildlife photographer) but am having trouble composing a unified image that doesn’t look part wax and part photo.
A lot to ask, but do you have any thoughts?
Hi Frumi, my best advice to you if you are just starting out is to take a class. There are so many so many mistakes that you will be able to avoid by learning from someone who has been there and done it all….so you don’t have to. For instance, if you took my beginners class you could post images for me to see your process and I could address your issues specifically. It might be your brush strokes, the brush you are using, the amount of wax you are applying, or maybe it’s in the fusing, what are you using to fuse, how are you doing it, what height are you from the substrate. And what does smooth texture mean? is it lumps and bumps, or pin holes from air bubbles.
I’m not just trying to sell my course. Learn from anyone, but take a class and get the basics. There is too much to this process to learn on your own.
If you want to know more about my online class you can go to https://photoencaustic.comclone2/encaustic-photography/
Good luck.