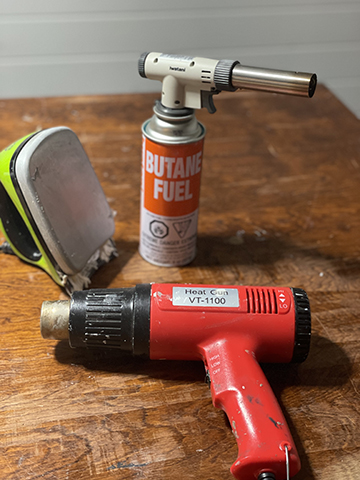
Fusing Revisited.
Fusing is at the very core of encaustic painting, and essential for creating a long-lasting piece of art. Each layer needs to be gently heated in order to bond to the previous layer forming a single entity.
The source of the heat isn’t nearly as important as the act of fusing.
You can use a heat gun, torch, iron, heat lamp, which is slightly unconventional and time consuming, or a multitude of other heat sources.
Sounds easy enough.
But don’t be fooled, it can be quite tricky.
The different sources can provide different textures and different results as the wax responds to the heat source differently, the one constant being that the layers are fused. I often use all three tools in each piece I create.
Here’s a breakdown of the differences.
HEAT GUN
The heat gun allows you to maintain texture and is the gentlest of the three tools.
A heat gun with variable temperature controls is best, but there are a few different ways to control the heat on a heat gun.
One way is with the temperature gauge itself. The other is the height at which you hold the gun. Both ways allow you to lower the heat as you apply it to the wax.
The benefits of a heat gun are in its subtlety. Heat guns work well to fuse over tenuous areas and fragile photographs. Gently fusing with a heat gun is also a great way to leave texture.
When using a heat gun be careful not to blow the wax around – at least initially. It can cause ridges and pool on the surface.
I hold the gun fairly perpendicular to the surface and move the gun in a circular movement in a small area. As soon as the wax begins to melt again, move that circular action to another unfused area. This keeps the heat localized and is more efficient than moving it from one edge of the substrate to the other.
BLOW TORCH
The Blow Torch liquefies and blends layers together to give a wonderfully smooth surface.
It’s a faster method, so you’ll need to use a slightly different back and forth motion across the entire substrate. You must keep the torch moving at all times otherwise you risk overheating one area.
The brand of your torch doesn’t matter. You can pick one up at your local hardware store. I recommend a self-igniting torch because it’s a little easier to use and allows you to adjust your flame.
There are all sorts of torches available. Crème brûlée torches are a great option for small areas, and a Benzomatic (or similar) is a great option for larger areas.
Choose what you feel comfortable using. You will learn to adjust the flame for your specific task.
Always be careful of an open flame in the studio and know what materials are flammable in your work space.
IRON
An iron gives a slightly different effect when used for fusing.
The benefit of using an iron is that it melts the wax below the heated surface and fills in any bumps, ripples or textures. It does this by pushing the layers of wax down to any low spots to smooth your surface.
Irons can create wonderful texture in a couple of different ways. The first is that an iron will frequently leave drag marks as you move across your piece. And the second is that you can ‘knock down’ drip marks without completely smoothing them out allowing for a unique look.
You can use any flat iron without steam holes for this. I find that ski waxing irons work best for this because they have an adjustable temperature gauge.
TIPS FOR FUSING
- When beeswax begins to glisten or shine it is in the molten stage and begins to fuse. You don’t need the layers to liquefy
- Keep your substrate flat when fusing
- Change temperature by moving further from the surface
- Be patient…very, very patient…
- Physics is your friend. Don’t move the heat gun from one side of the substrate to the other (like using a hair dryer to dry your hair) before fusing is completed. Don’t let it cool down as you move the heat to the other side and then back again as this is a very inefficient way of working
- Keep your heat source moving to avoid crater-like areas or bald spots. To fix these bald spots try dripping small amounts of wax on to the bald spots and fusing very lightly from a distance (i.e., keeping your heat gun at least 12 inches from the substrate and letting the wax even out very gently). The wax will slowly melt and naturally fill in those spots
- Bubbles (or pinholes) are caused by air in the substrate migrating to the top. Too much reheating can also cause the bubbles to appear, so try to avoid backtracking over an already bubble free area and try to keep moving in one direction when fusing
- Be careful, an open flame can burn your photograph easily, especially tissue paper
If you’re interested in learning the basic techniques of Photo Encaustics, in the comfort of your own home, then my program The Artistic Image could be just what you’re looking for.
This is a comprehensive 6-week online course for beginners who want to learn more about this incredible medium and create their own stunning pieces of art.
Would love to hear in the comments if you have any other way that you fuse your work.
Be well….be creative,

Appreciate the refresher! Thank you:)
You are very welcome Noreene. Hope you are still creating great work!