Fusing Revisited.
Fusing sits at the heart of encaustic painting. It’s the moment when each new layer of wax and pigment bonds to the one beneath it, forming a single, unified surface. Whether you’re working with traditional encaustic techniques or exploring the beautiful world of photo encaustics, fusing is what gives your artwork strength and longevity. It’s one of the foundational skills I teach inside The Artistic Image and throughout my encaustic photography resources at photoencaustic.com.
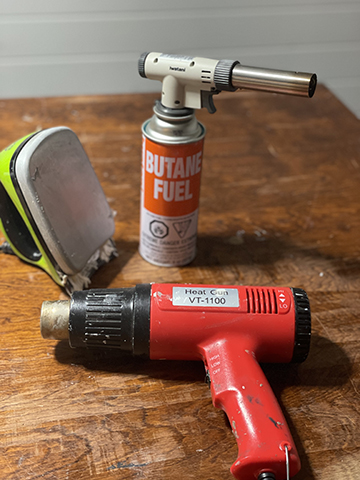
The tool you use matters less than the act of gently heating the wax until it softens and connects. You can fuse with a heat gun, torch, iron, heat lamp, or whatever controlled heat source you’re comfortable using. It sounds straightforward, but it can take practice to understand how wax responds to each tool—and how different kinds of heat create different textures.
A heat gun is the gentlest option, allowing you to preserve texture and safely fuse over delicate photographic layers. Height and temperature control matter here, and subtlety is your friend. Keep the gun moving in small circles and watch for that soft glisten—the sign the wax is entering the molten stage.
A blow torch behaves differently. It melts and blends layers quickly, creating a beautifully smooth surface when used correctly. The key is constant motion. Pause too long and the wax overheats. Many artists like crème brûlée torches for small areas and Benzomatic-style torches for larger pieces. Choose what feels comfortable, and always stay mindful of flame safety in the studio.
An iron offers yet another effect, heating from below the surface rather than above. It smooths uneven areas and fills in low spots. Drag marks from the iron can create lovely patterns, and you can knock down drips while still keeping a bit of organic texture. Ski waxing irons work well because they offer precise temperature control.
No matter what tool you choose, here are a few reminders I share with my students:
- When the beeswax begins to glisten, it’s fusing—you don’t need it fully liquefied.
- Keep your substrate flat.
- Change heat intensity by adjusting distance.
- Move slowly and steadily—fusing is a patient process.
- Avoid reheating areas repeatedly, which can create bubbles.
- If bald spots appear, drip in a bit of wax and fuse from a distance.
- Be mindful of flame near tissue paper images—they burn fast.
Like everything in encaustic, fusing is both science and intuition. Once you understand how wax behaves, the process becomes beautifully meditative. It’s also one of the reasons I love teaching encaustic photography—watching students discover how layering, fusing, and light transform a simple photograph into something dimensional and luminous.
If you want to learn the fundamentals of photo encaustic work at home, my online course The Artistic Image is a great place to begin. It walks you through the entire process—from choosing images, to fusing, to pigment work, to creating surfaces rich with depth and meaning. You’ll find it at:
Fusing may be tricky at first, but once you understand it, the medium opens up in magical ways.
Would love to hear in the comments if you have any other way that you fuse your work.
Be well….be creative,
Clare
Learn how photographs, wax, and intuition come together.
View my photo encaustic classes, courses, and workshops.
Appreciate the refresher! Thank you:)
You are very welcome Noreene. Hope you are still creating great work!